Best Practice
If you are processing an open credit to credit an invoice that was not created in Micronet, you should always check the prices of items you are crediting to make sure you only credit the prices the customer actually paid.
Whenever you create a new credit note or recall an existing one, Micronet displays the Credit Creation Header screen where you enter the main details of the credit note. This includes entering the invoice number that you want to credit if the invoice was processed in Micronet. You should always enter the Micronet invoice number on the Credit Creation Header screen. This ensures that, if there have been price increases, the customer only receives a credit for the prices they paid at the time of the invoice.
|
|
|
Best Practice If you are processing an open credit to credit an invoice that was not created in Micronet, you should always check the prices of items you are crediting to make sure you only credit the prices the customer actually paid. |
To access and maintain the Credit Creation Header details:
Refer to "Creating a New Credit Note" or "Recalling a Credit Note".
Micronet displays the Credit Creation Header screen.
|
|
Field |
Value |
|
|
Debtors Number |
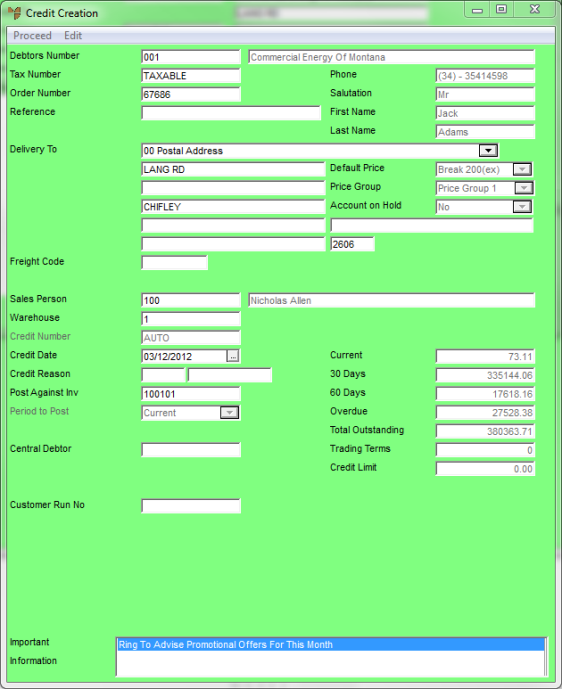
Micronet displays the ID and description of the debtor you entered on the Credit Creation screen. |
|
|
Tax Number |
Micronet displays the debtor's default tax number from the Debtor master file (refer to "File - Debtor - Debtor"). You may leave this as TAXABLE for GST, or enter EXEMPT. |
|
|
Order Number |
If you enter an invoice number in the Post Against Inv field, Micronet displays the purchase order number for the invoice. If you are processing an open credit, enter the purchase order number from the customer. |
|
|
Reference |
2.8 Feature Enter any order reference. This is a free text field, e.g. you may enter the person who supplied the order number, a date or any other relevant information. |
|
|
Delivery To |
Micronet displays the customer's postal address. You can select an alternative delivery address if required. Debtor delivery addresses are setup in the Debtor master file (refer to "File - Debtor - Debtor" and "File - Debtor - Delivery"). |
|
|
Phone |
Micronet displays the default phone number for the debtor from the Debtors master file. |
|
|
Salutation |
2.8 Feature Micronet displays the salutation of the main contact for this debtor from the Debtors master file. |
|
|
First Name |
2.8 Feature Micronet displays the first name of the debtor's main contact. |
|
|
Last Name (2.8) / Contact (2.7) |
Micronet displays the last name of the debtor's main contact. |
|
|
Default Price |
Micronet displays the default price break for this debtor. |
|
|
Price Group |
Micronet displays the default price group for the debtor from the Debtors master file. |
|
|
Account on Hold |
Micronet displays Yes if this account has been placed on hold, or No if it has not. |
|
|
Freight Code |
If you enter an invoice number in the Post Against Inv field, Micronet displays the freight code from the invoice. |
|
|
Sales Person |
If you enter an invoice number in the Post Against Inv field, Micronet displays the salesperson who processed the invoice. Otherwise, it displays the default salesperson for this debtor. If salesperson commissions are involved, you should leave this as the salesperson who processed the invoice. Micronet will then automatically reverse the commission. In other cases, you may want to change this to your own code as the salesperson processing the credit note. 2.8 Feature If the salesperson you want does not appear in the list of salespeople, it is probably because they have been made inactive – refer to "File - Salesperson - Sales Person". |
|
|
Warehouse |
If you enter an invoice number in the Post Against Inv field, Micronet displays the warehouse the items were invoiced from. Otherwise it displays the default warehouse for this debtor. Enter or select the warehouse that the items on this credit note are to be returned to. You can only change the invoicing warehouse if the Transfer C/Note Stk from Invoice W/H field on the Invoicing Configuration screen is set to Yes (refer to "Edit - Program - Invoicing"). |
|
|
Credit Number |
Enter a credit note number if required. Micronet generates your credit note numbers automatically based on whether the Use Warehouse Numbers field is set to a system wide or per warehouse numbering system. For more details on generating credit note numbers automatically, refer to "Edit - Program - General". |
|
|
Credit Date |
Micronet displays today's date as the credit note date. You can change this date if required. |
|
|
Credit Reason |
Select the reason for this credit note. Credit note reasons are setup in the Class master file (refer to "File - Class"). |
|
|
Post Against Inv |
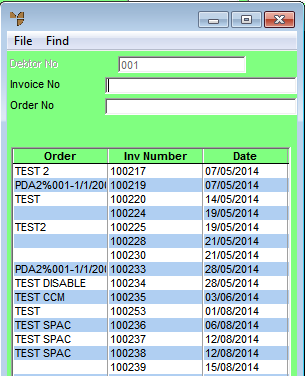
If you are crediting an invoice that has already been processed in Micronet, enter the invoice number. This links the credit note to the original invoice and reduces the amount payable against the original invoice. If you don't know the invoice number, press the spacebar then press Enter. Micronet displays a selection screen with a list of invoices for the debtor so you can select the correct invoice. It also displays this screen if you enter an incorrect invoice number.
Micronet displays the invoices matching your criteria at the bottom of the screen.
Micronet redisplays the Credit Creation Header screen. If you don't enter or select an invoice number (e.g. because the invoice was created before Micronet was installed), Micronet posts the amount as an open credit to the debtor's account. |
|
|
|
Technical Tip If you enter an invoice number and Micronet displays a message that it can't find the invoice in the Debtors Transaction file, it simply means that the invoice has gone into the Debtors History file. When you select OK on this message, Micronet redisplays the Credit Creation Header screen. You can either:
|
|
|
Period to Post |
Select the period you want to post the credit note to on the customer account. Generally, you would post the credit note to the same period in which the invoice was processed so they both show in the same period on the debtor's account. If no invoice is selected in the Post Against Inv field, select a period for the open credit to be assigned to. |
|
|
Central Debtor |
If this debtor has a central debtor for invoicing, Micronet displays the central debtor. |
|
|
Customer Run No |
Micronet displays the debtor's default run number for standing orders from the Debtors master file (refer to "File - Debtor - Debtor"). For more information on standing orders, refer to "Sales - Standing Orders". |
|
|
Current |
Micronet displays the amount owed by this debtor for the current month. |
|
|
30 Days |
Micronet displays the amount owed by this debtor for the previous month. |
|
|
60 Days |
Micronet displays the amount owed by this debtor for two months prior to the current month. |
|
|
Overdue |
Micronet displays any amount owing that is overdue. |
|
|
Total Outstanding |
Micronet displays the total outstanding amount for this debtor. |
|
|
Trading Terms |
Micronet displays any trading terms set for this debtor. |
|
|
Credit Limit |
Micronet displays any credit limit set for this debtor. |
|
|
Important Information |
Micronet displays any added text in the Debtors master file that is assigned to display as important information on credit notes. |
Micronet loads all the details from the original invoice header and lines. Refer to "Credit Creation Header - Edit - Load Invoice" for more information about this option.
|
|

|
Warning You should only ever load an invoice into a credit note once. Loading an invoice more than once will duplicate the invoice lines and increase the amount to be credited. |
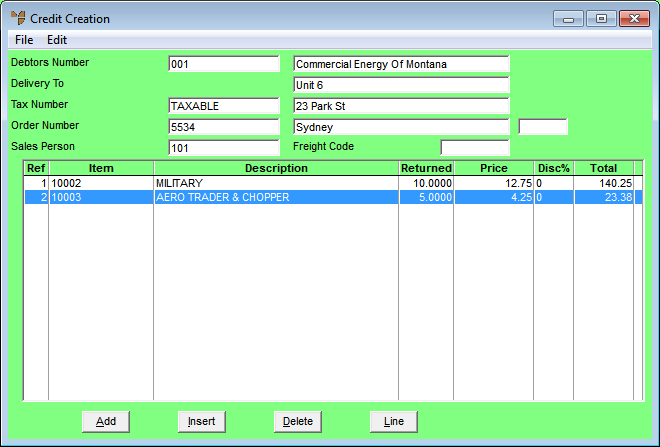
Micronet redisplays the Credit Creation screen. If you entered or selected an invoice to credit, Micronet displays the invoice item details, costs and selling prices (and serial numbers if applicable).